
Deslumbra a tus invitados con guarniciones impresionantes como capullos de rosa de limón confitado sobre un pastel de queso o rosas de tomate en fettuccine cremoso. Atrae a los niños con recortes divertidos de gelatina y flores de zanahoria. En esta guía experta, descubrirás 11 técnicas creativas para elevar cualquier plato, con instrucciones paso a paso y fotos detalladas. De rábanos básicos a decoraciones de chocolate sofisticadas, ¡conviértete en un maestro de la presentación culinaria!
Recetas complementarias incluidas en cada sección para hacer clic y probar.
Las guarniciones añaden emoción, color y estilo a tus comidas. Con las herramientas adecuadas y técnicas simples, lograrás resultados profesionales.
- Herramientas para decorar: Equipos esenciales como peladores, rizadores y cortadores.
- Guarniciones cítricas: Nudos, rodajas ranuradas, bucles y cáscaras confitadas.
- Abanicos, flores y mariposas: De fresas, cerezas y cítricos.
- Guarniciones de chocolate: Rizos, recortes y frutas bañadas.
- Guarniciones de pimiento morrón: Aros, canastas, triángulos y tazas.
- Guarniciones de zanahoria: Flores, rizos y estrellas.
- Guarniciones de pepino y calabacín: Giros, cintas y flores.
- Guarniciones de verduras: Abanicos de rábano, juliana de zanahoria y nabos.
- Adornos para cestas de frutas: De sandía y piña.
- Guarniciones lácteas: Formas de mantequilla, huevos cocidos y queso crema.
- Guarniciones de tocino: Rizos crujientes.
- Herramientas para adornar
- Guarniciones de cítricos
- Abanicos, flores y adornos de mariposas
- Adornos de chocolate
- Recortes de chocolate y más
- Guarniciones de pimiento morrón
- Guarniciones de zanahoria
- Guarniciones de pepino y calabacín
- Guarniciones de vegetales
- Adornos para cestas de frutas
- Barcos de piña y más
- Guarniciones lácteas
- Guarniciones de tocino
Utensilios para Decorar
Una presentación visual atractiva estimula el apetito. Confía en herramientas especializadas para guarniciones espectaculares. ©2006 Publications International, Ltd.
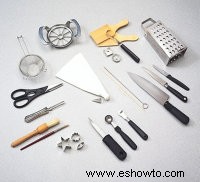
Fila 1: Tamiz, cortador de manzanas, rizador de mantequilla. Fila 2: Tijeras, cono de pergamino, brochetas. Fila 3: Pelador de verduras, tips de decoración. Fila 4: Cepillos, cortadores pequeños, cuchillo para toronjas.
- Cortador/descorazonador de manzanas: Para verduras y frutas.
- Brochas: Pequeñas para precisión.
- Rizador de mantequilla: Para rizos delicados.
- Pistas para guarniciones brillantes: Cepilla con jugo de limón para evitar oxidación. Blanquea verduras para realzar color.
Guarniciones Cítricas
Frutas cítricas vibrantes aportan frescura. Elige firmes y uniformes.